Starting assistance and charging the 12 V battery
Preparing starting assistance/charging
Secure the vehicle by applying the electric parking brake.
Shift the transmission to position  .
.
. Switch off the vehicle and all electrical consumers.
Open the bonnet.
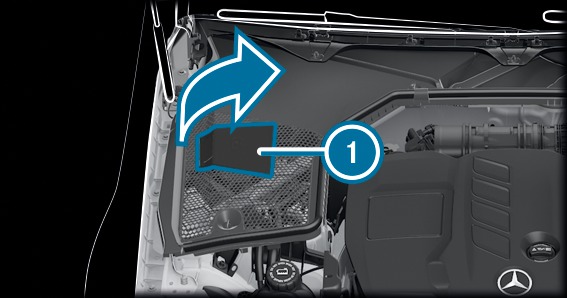
Fold cover  up in the direction of the arrow.
up in the direction of the arrow. 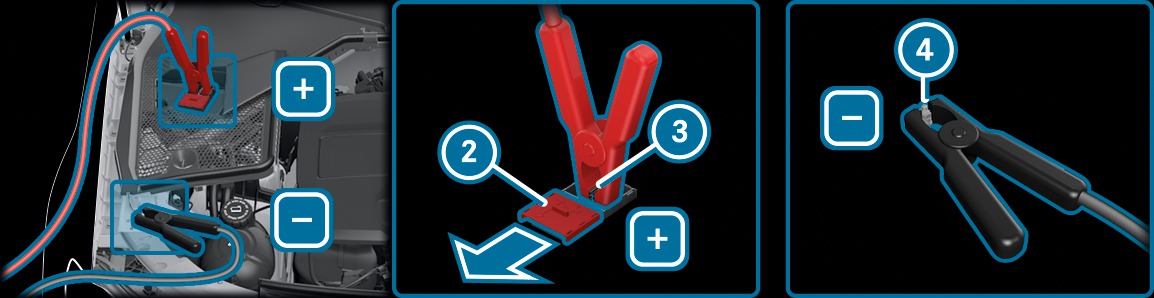
Slide cover  of positive clamp
  on the jump-starting connection point in the direction of the arrow.
of positive clamp on the jump-starting connection point in the direction of the arrow. Starting assistance
Connect positive contact on your vehicle to the positive terminal of the donor battery using the jump lead. Always begin with positive clamp on your own vehicle first.
on your vehicle to the positive terminal of the donor battery using the jump lead. Always begin with positive clamp on your own vehicle first. Start the engine of the donor vehicle and run it at idling speed.
Connect the negative terminal of the donor battery to earth point  of your vehicle using the jump lead. Begin with the donor battery first.
of your vehicle using the jump lead. Begin with the donor battery first. Start the engine of your own vehicle.
Let the engines run for several minutes.
Before disconnecting the jump leads, switch on an electrical consumer in your own vehicle, e.g. the rear window heater or the lighting.
When the starting assistance procedure is complete:
First, remove the jump leads from earth point and the negative terminal of the donor battery, then from positive contact and the positive terminal of the donor battery. Begin each time with the contacts on your own vehicle first.
and the negative terminal of the donor battery, then from positive contact and the positive terminal of the donor battery. Begin each time with the contacts on your own vehicle first. After removing the jump leads, close cover of positive contact .
of positive contact . Close cover .
. If your vehicle has been started with starting assistance, it may not be possible to use the electric drive for approximately 30 minutes.
Further information can be obtained at a qualified specialist workshop.
Charging
Connect positive contact of the vehicle to the positive terminal of the charger using the charging cable. Always begin with positive contact of the vehicle.
of the vehicle to the positive terminal of the charger using the charging cable. Always begin with positive contact of the vehicle. Connect the negative terminal of the charger and earth point on the vehicle with the charging cable. Start with the charger.
on the vehicle with the charging cable. Start with the charger. Start the charging process.
When the charging process is complete:
First, remove the charging cable from earth point and the negative terminal of the charger, then from positive contact and the positive terminal of the charger. Begin each time with the contacts of the vehicle.
and the negative terminal of the charger, then from positive contact and the positive terminal of the charger. Begin each time with the contacts of the vehicle. After removing the charging cable, close cover of positive contact .
of positive contact . Close cover .
. Further information can be obtained at a qualified specialist workshop.