If the tailpipe is blocked or sufficient ventilation is not possible, poisonous exhaust gases such as carbon monoxide may enter the vehicle. This is the case in enclosed spaces or if the vehicle gets stuck in snow, for example.
Flammable materials such as leaves, grass or twigs may ignite.
If the flow of hot air is blocked, the auxiliary heating may overheat and switch off.
Operating the stationary heater or stationary ventilation drains the battery.

The switch clock will switch to standby mode after ten seconds. The display will go off.
Saved settings will not be lost when the switch clock switches to standby mode.
 button until menu bar
  and the time are shown on the display.
 When you switch the auxiliary heating on for the first time after a malfunction, set the day and time.
You can find further information on malfunctions under "Problems with the auxiliary warm-air heater".
 or
or  button until the
  symbol flashes on menu bar
  .
.  button.
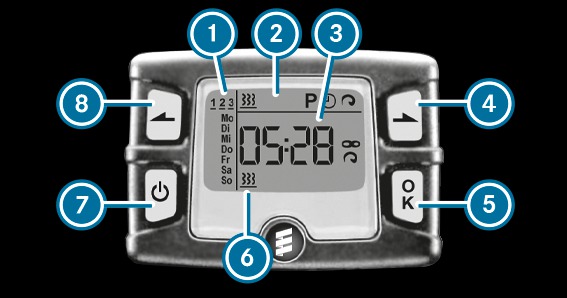
 The selected day will flash in program column  .
.
 or
or  button to select the desired day.
  button.
 The selected day will be stored.
The hour value on the clock will flash.
 button.
 The time will be stored. Program column  will not be shown and the operating duration will flash on display section
  .
.
The operating duration set is the default setting for immediate heating mode. You can set the operating duration within a range of 10 to 120 minutes or to continuous operation.
 or
or  button to set the minute value or the
  symbol to select continuous operation.
  button.
 The operating duration will be stored and the time will be shown on display section  .
.
You can set the heating level to between 10 and 30.
The heating level corresponds to a preselected temperature for the vehicle interior. This is a guide value and, depending on the ambient temperature, may differ from the actual vehicle interior temperature.
 or
or  button until the
  symbol flashes on menu bar
  .
.  button.
 The heating level will flash on display section  .
.
 or
or  button to set the desired heating level.
  button.
  or
or  button until the
  symbol flashes on menu bar
  .
.  button.
 The  symbol will be shown on display section
  and the operating duration will flash.
The temperature level will be shown on display section  .
.
 or
or  button until the
  symbol flashes on menu bar
  .
.  button.
 The  symbol will not be shown on display section
  .
.
The auxiliary heating will continue to run for approximately three minutes and will then switch off automatically.
Preselected heating mode is available only for vehicles that are not equipped to transport hazardous goods.
You can set three preselection periods using the switch clock.
When setting the preselection period, make sure that it corresponds not to the switch-on time but to the switch-off or departure time. The auxiliary heating will start up automatically prior to departure and run for the set operating duration.
If identical preselection periods (time and day) are set in the preselection memory, only the last preselection period set will be saved.
When switching on the auxiliary heating for the first time following a malfunction or voltage supply interruption, you will need to set the preselection periods again.
 or
or  button until the
  symbol flashes on menu bar
  .
.  button.
 The preselection memory numbers  will be shown in program column
  . The selected preselection memory number will flash.
 or
or  button to select the desired preselection memory number.
  button.
 The preselection memory number will be selected. The days will be displayed.
The preselection period will be stored. Program column  will be hidden. The message on and symbol
  will appear on display section
  .
.
 button.
 The operating duration will flash on display section  .
.
The operating duration for the preselection period will be stored. The time and the number of the set preselection memory will be shown.
An underscore denotes the preselection memory that will be next to be activated in chronological order. The selected day will also be shown.
 symbol is shown on display section
  : press the
  or
or  button until off appears.
  button.
 The preselection period will be deactivated and the time will be shown on display section  .
.

