Activating/deactivating the hazard warning lamps
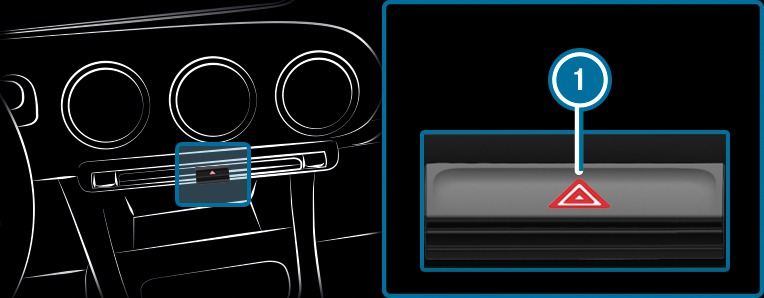
Press button  .
.
. The hazard warning lamps will switch on automatically if:
the airbag has been deployed.
the vehicle is heavily braked from a speed of more than 70 km/h to a standstill.
When you pull away again, the hazard warning lamps will switch off automatically at approximately 10 km/h. You can also switch off the hazard warning lamps using button .
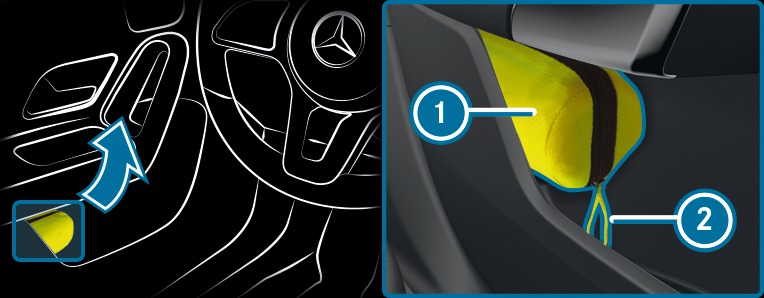
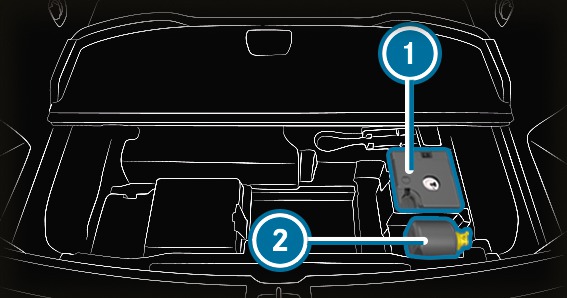
Removing the fire extinguisher
WARNING Risk of accident due to an incorrectly secured fire extinguisher in the driver's footwell
A fire extinguisher in the driver's footwell may impede pedal travel or block a depressed pedal.
This jeopardises the operating and road safety of the vehicle.
Moreover, the fire extinguisher can be thrown about in the driver's footwell and injure the driver or other vehicle occupants.
Always store and secure the fire extinguisher in the bracket.
Do not remove the fire extinguisher while driving.

Left-hand drive vehicle: pull tab upwards.
upwards. Remove fire extinguisher  .
.
. Removing the safety vest
The safety vests are located in the safety vest compartments in the driver's and front passenger door stowage compartments.
To remove:
pull out safety vest bag by loop . Open safety vest bag and pull out the safety vest.
and pull out the safety vest. There are also safety vest compartments in the rear door stowage compartments in which safety vests can be stored.
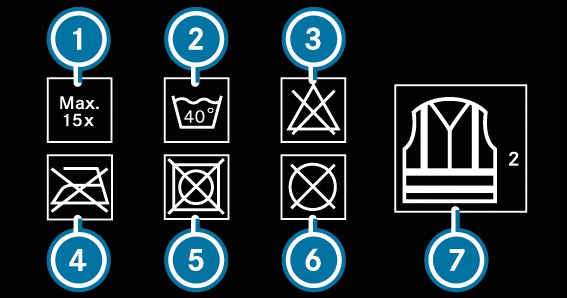


The requirements defined by the legal standard are only fulfilled if the safety vest is the correct size and is fully closed.
The safety vest must be replaced in the following situations:
the reflective strips are damaged or dirty
the maximum permissible number of washes is exceeded
the fluorescence has faded
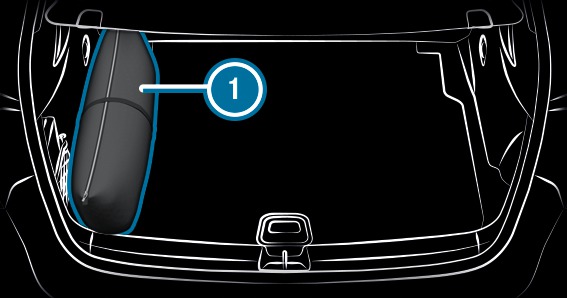
Removing the warning triangle
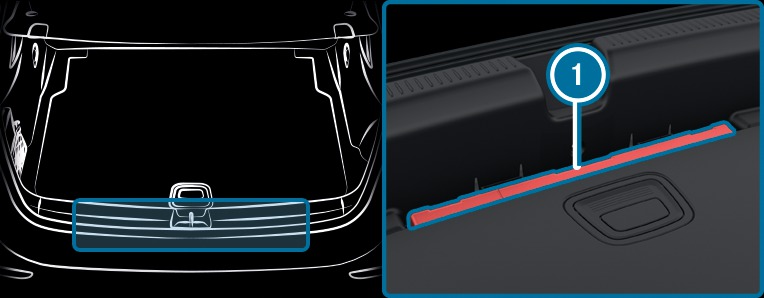
Remove warning triangle .
. First-aid kit (soft-sided) overview
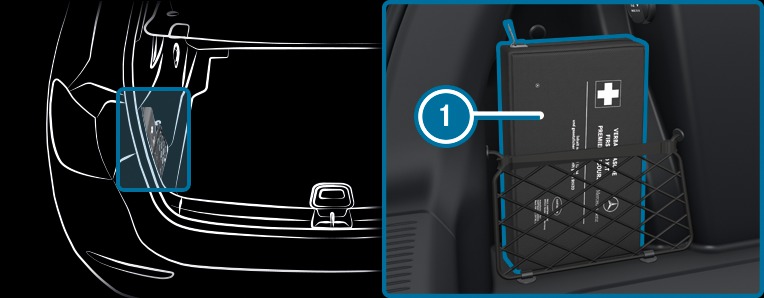
First-aid kit (soft sided) is in the load compartment in the left-hand stowage net.
Depending on the vehicle's equipment, the first-aid kit (soft-sided) is in the recess in the side trim.
QR code for rescue card
The QR code is secured in the fuel filler flap and on the opposite side on the B-pillar. In the event of an accident, rescue services can use the QR code to quickly find the appropriate rescue card for your vehicle. The current rescue card contains the most important information about your vehicle in a compact form, e.g. the routing of the electric lines.
Further information can be obtained at Mercedes-Benz homepage - rescue card.
Starting assistance and charging the 12 V battery
Requirements:
The vehicle is secured with the electric parking brake.
Automatic transmission: the transmission is in position
 .
. Manual transmission: the transmission is in neutral.
The ignition and all electrical consumers are switched off.
The bonnet is open.

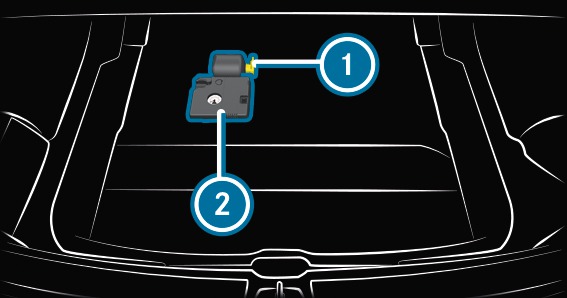
Slide cover of positive clamp on the jump-starting connection point in the direction of the arrow.
of positive clamp on the jump-starting connection point in the direction of the arrow. Connect positive clamp on your vehicle to the positive pole of the donor battery using the jump lead/charging cable. Always begin with positive clamp on your own vehicle first.
on your vehicle to the positive pole of the donor battery using the jump lead/charging cable. Always begin with positive clamp on your own vehicle first. During starting assistance:
start the engine of the donor vehicle and run at idle speed. Connect the negative pole of the donor battery and earth point of your own vehicle by using the jump lead/charging cable. Begin with the donor battery first.
of your own vehicle by using the jump lead/charging cable. Begin with the donor battery first. During starting assistance:
start the engine of your own vehicle. During the charging process:
start the charging process. During starting assistance:
let the engines run for several minutes. During starting assistance:
before disconnecting the jump lead, switch on an electrical consumer in your own vehicle, e.g. the rear window heater or lighting. When the starting assistance/charging process is complete:
First, remove the jump lead/charging cable from earth point and the negative pole of the donor battery, then from positive clamp and the positive pole of the donor battery. Begin each time with the contacts on your own vehicle first.
and the negative pole of the donor battery, then from positive clamp and the positive pole of the donor battery. Begin each time with the contacts on your own vehicle first. After removing the jump lead/charging cable, close cover of positive clamp .
of positive clamp . Further information can be obtained at a qualified specialist workshop.
Notes on electrical fuses
WARNING Risk of accident and injury due to overloaded lines
If you manipulate or bridge a faulty fuse or if you replace it with a fuse with a higher amperage, the electric line could be overloaded.
This could result in a fire.
Always replace faulty fuses with specified new fuses containing the correct amperage.
NOTE Damage due to incorrect fuses
Electrical components or systems may be damaged by incorrect fuses, or their functionality may be significantly impaired.
Only use fuses that have been approved by Mercedes-Benz and which have the correct fuse rating.
Blown fuses must be replaced with fuses of the same rating, which you can recognise by the colour and fuse rating. The fuse ratings and further information to be observed can be found in the fuse assignment diagram.
Fuse assignment diagram: on the fuse box in the engine compartment More.
NOTE Damage or malfunctions caused by moisture
Moisture may cause damage to the electrical system or cause it to malfunction.
When the fuse box is open, make sure that no moisture can enter the fuse box.
When closing the fuse box, make sure that the seal of the lid is positioned correctly on the fuse box.
If the newly inserted fuse also blows, have the cause traced and rectified at a qualified specialist workshop.
Ensure the following before replacing a fuse:
The vehicle is secured against rolling away.
All electrical consumers are switched off.
The ignition is switched off.
Notes on flat tyres
WARNING Risk of accident due to a flat tyre
A flat tyre severely affects the driving characteristics as well as the steering and braking of the vehicle.
Tyres without run-flat characteristics:
Do not drive on with a flat tyre.
Change the flat tyre immediately with an emergency spare wheel or spare wheel. Alternatively, consult a qualified specialist workshop.
Tyres with run-flat characteristics:
Observe the information and warning notes on MOExtended tyres (run-flat tyres).
In the event of a flat tyre, the following options are available depending on your vehicle's equipment:
Vehicles with MOExtended tyres: it is possible to continue the journey for a short period of time. Make sure you observe the notes on MOExtended tyres (run-flat tyres) More.
Vehicles with a TIREFIT kit: you can repair the tyre so that it is possible to continue the journey for a short period of time. To do this, use the TIREFIT kit More.
Vehicles with Mercedes me connect: you can make a call for breakdown assistance via the overhead control panel in the case of a breakdown More.
All vehicles: change the wheel More.
The emergency spare wheel is only available in certain countries.
Overview of the tyre-change tool kit
Apart from some country-specific variants, vehicles are not equipped with a tyre-change tool kit. For more information on which tyre-changing tool kits are required and approved for performing a wheel change on your vehicle, consult a qualified specialist workshop.
You require the following tools, for instance, to change a wheel:
Jack
Chock
Wheel wrench
Centring pin
The jack weighs approximately 3.4 kg.
The maximum load capacity of the jack can be found on the sticker affixed to the jack.
The jack is maintenance-free. If there is a malfunction, please contact a qualified specialist workshop.
Tool bag contains:
Jack
Gloves
Wheel wrench
Centring pin
Folding chock
Ratchet for jack
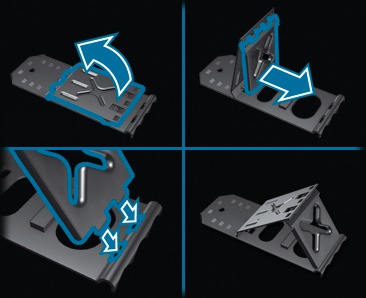
Setting up the folding chock
Overview of the tyre-change tool kit
Apart from some country-specific variants, vehicles are not equipped with a tyre-change tool kit. For more information on which tyre-changing tools are required and approved for performing a wheel change on your vehicle, consult a qualified specialist workshop.
You require the following tools, for instance, to change a wheel:
Jack
Chock
Wheel wrench
Centring pin
The jack weighs approximately 3.4 kg.
The maximum load capacity of the jack can be found on the sticker affixed to the jack.
The jack is maintenance-free. If there is a malfunction, please contact a qualified specialist workshop.
Tool bag contains:
Jack
Gloves
Wheel wrench
Centring pin
Folding chock
Ratchet for jack
Setting up the folding chock
TIREFIT kit storage location
The TIREFIT kit is located under the load compartment floor.
You can find information on the power category (LK) and/or electrical data on the back of the tyre inflation compressor:
LK2 – 12 V/15 A, 180 W, 0.8 kg
At a distance of approximately 1 m to the tyre inflation compressor and approximately 1.6 m above the ground, the following sound pressure levels apply:
Emission sound pressure level LPA83 dB (A)
Sound power level LWA 91 dB (A)
The tyre inflation compressor is maintenance-free. If there is a malfunction, please contact a qualified specialist workshop.
TIREFIT kit storage location
The TIREFIT kit is located under the boot floor.
You can find information on the power category (LK) and/or electrical data on the back of the tyre inflation compressor:
LK2 – 12 V/15 A, 180 W, 0.8 kg
At a distance of approximately 1 m to the tyre inflation compressor and approximately 1.6 m above the ground, the following sound pressure levels apply:
Emission sound pressure level LPA 83 dB (A)
Sound power level LWA 91 dB (A)
The tyre inflation compressor is maintenance-free. If there is a malfunction, please contact a qualified specialist workshop.
Towing the vehicle with both axles on the ground
Observe the notes on the permitted towing methods More.
Make sure that the battery is connected and charged.
Observe the following points when the battery is discharged:
the engine cannot be started
the electric parking brake cannot be released or applied
vehicles with automatic transmission: the automatic transmission cannot be shifted to position
 or .
or .
Vehicles with automatic transmission: if the automatic transmission cannot be shifted to position , or the multifunction display in the instrument cluster does not show anything, have the vehicle transported away More. A towing vehicle with lifting equipment is required for vehicle transportation.
NOTE Damage due to towing away at excessively high speeds or over long distances
The drivetrain could be damaged when towing at excessively high speeds or over long distances.
A towing speed of 50 km/h must not be exceeded.
A towing distance of 50 km must not be exceeded.
WARNING Risk of accident when towing a vehicle which is too heavy
If the vehicle being tow-started or towed away is heavier than the permissible gross mass, the following situations can occur:
the towing eye may become detached.
the car/trailer combination may swerve or even overturn.
If another vehicle is tow-started or towed away, its weight must not exceed the permissible gross mass of your own vehicle.
If a vehicle must be tow-started or towed away, its permissible gross weight must not exceed the permissible gross weight of the towing vehicle.
Information on the permissible gross weight of the vehicle can be found on the vehicle identification plate More.
Vehicles with automatic transmission: do not open the driver's door or front passenger door, otherwise the automatic transmission automatically shifts to position .
. Fit the towing eye More.
Fasten the tow bar.
NOTE Damage due to incorrect connection of the tow bar
Only connect the tow rope or tow bar to the towing eyes.
Deactivate the automatic locking mechanism More.
Do not activate the HOLD function.
Deactivate tow-away protection More.
Deactivate Active Brake Assist More.
Vehicles with automatic transmission: shift the automatic transmission to position .
. Vehicles with manual transmission: shift to neutral .
. Release the electric parking brake.
Switch on the ignition, otherwise the steering wheel locking may engage.
WARNING Risk of accident due to limited safety-related functions during the towing process
Safety-related functions are limited or no longer available in the following situations:
the ignition is switched off.
the brake system or power steering system is malfunctioning.
the energy supply or the on-board electrical system is malfunctioning.
When your vehicle is then towed away, significantly more effort may be required to steer and brake than is normally required.
Use a tow bar.
Make sure that the steering wheel can move freely, before towing the vehicle away.
NOTE Damage due to excessive tractive power
If you pull away sharply, the tractive power may be too high and the vehicles could be damaged.
Pull away slowly and smoothly.