Notes on regularly inspecting wheels and tyres
WARNING Risk of injury due to damaged tyres
Damaged tyres can cause tyre pressure loss.
Check the tyres regularly for signs of damage and replace any damaged tyres immediately.
Check the wheels and tyres of your vehicle for damage regularly, i.e. at least every two weeks, as well as after driving off-road or on rough roads. Damaged wheels can lead to a loss of tyre pressure.
Look out for the following types of damage, for example:
cuts in the tyres
punctures in the tyres
tears in the tyres
bulges on tyres
deformation or severe corrosion on wheels
WARNING Risk of aquaplaning due to insufficient tyre tread
Insufficient tyre tread will result in reduced tyre grip.
The risk of aquaplaning is increased on wet roads, especially when the speed of the vehicle is not adapted to suit the conditions.
Thus, you should regularly check the tread depth and the condition of the tread across the entire width of all tyres.
Minimum tread depth for:
Summer tyres: 3 mm
M+S tyres: 4 mm
For safety reasons, replace the tyres before the legally-prescribed limit for the minimum tread depth is reached.
Conduct the following checks regularly on all wheels, at least once a month or as required, e.g. before a long journey or when driving off-road:
check the tyre pressure More
check the valve caps
Valves must be protected from moisture and dirt with valve caps specifically approved by Mercedes-Benz for your vehicle.
visually inspect the tread depth and the tyre tread across the whole tyre width
The minimum tread depth for summer tyres is 3 mm and for winter tyres 4 mm.
Notes on snow chains
WARNING Risk of accident due to incorrectly fitted snow chains
If you have fitted snow chains to the rear wheels, they may drag against the vehicle body or chassis components.
Never fit snow chains on the rear wheels.
Only fit snow chains on the front wheels in pairs.
For safety reasons, Mercedes-Benz recommends that you only use snow chains that have been checked and approved. You can find further information on snow chains recommended for Mercedes-Benz in the wheel and tyre overview at Homepage Mercedes-Benz.
WARNING Risk of accident due to snow chains breaking
If you drive too fast with snow chains, they can break, injure other persons, and damage the vehicle.
Observe the maximum permissible speed for operation with snow chains.
Observe the following notes when using snow chains:
Snow chains are only permissible for certain wheel/tyre combinations. You can obtain information on them at a qualified specialist workshop.
For safety reasons, only use snow chains approved by Mercedes-Benz .
Use snow chains only when the road surface is completely snow-covered. Remove the snow chains as soon as possible when you come to a road that is not snow-covered.
Local regulations may restrict the use of snow chains. Observe the applicable regulations before fitting snow chains.
If snow chains are fitted, the maximum permissible speed is 50 km/h.
You can deactivate ESP® to pull away More. This allows the wheels to spin, achieving an increased driving force.
Notes on windscreen washer fluid
Observe the notes on operating fluids More.
WARNING Risk of fire and injury from windscreen washer concentrate
Windscreen washer concentrate is highly flammable. If it comes into contact with hot components, it may ignite.
Make sure that windscreen washer concentrate is not spilled near to the filler opening.
NOTE Damage to the exterior lighting due to unsuitable windscreen washer fluid
Unsuitable windscreen washer fluids may damage the plastic surface of the exterior lighting.
Only use windscreen washer fluids which are also suitable for use on plastic surfaces, e.g. MB SummerFit or MB WinterFit.
NOTEBlocked spray nozzles caused by mixing windscreen washer fluids
Do not mix MB SummerFit and MB WinterFit with other windscreen washer fluids.
Do not use distilled or de-ionised water. Otherwise, the fill level sensor may give a false reading.
Recommended windscreen washer fluid:
Above freezing point: e.g. MB SummerFit
Below freezing point: e.g. MB WinterFit
For the correct mixing ratio, refer to the information on the anti-freeze container.
Mix the washer fluid with windscreen washer fluid all year round.
Filling up the windscreen washer system
WARNING Risk of burns when opening the bonnet
If you open the bonnet in the event of an overheated drive system or fire in the engine compartment, the following situations may occur:
you may come into contact with hot gases.
you may come into contact with other escaping hot operating fluids.
Before opening the bonnet, allow the components to cool down.
In the event of a fire in the engine compartment, keep the bonnet closed and call the fire service.
WARNING Risk of injury due to moving parts
Components in the engine compartment may continue running or start up suddenly, even if the ignition is switched off.
Make sure of the following before performing tasks in the engine compartment:
Switch the ignition off.
Never reach into the danger zone surrounding moving components, e.g. the rotation area of the fan.
Remove jewellery and watches.
Keep items of clothing and hair away from moving parts.
WARNING Risk of fire and injury from windscreen washer concentrate
Windscreen washer concentrate is highly flammable.
Avoid fire, naked flames, smoking and the creation of sparks when using windscreen washer concentrate.
WARNING Risk of burns from hot components in the engine compartment
Certain components in the engine compartment can be very hot, e.g. the drive system and the cooler.
Allow the drive system to cool down and touch only the components described below.
NOTE Damage to the exterior lighting due to unsuitable windscreen washer fluid
Unsuitable windscreen washer fluids may damage the plastic surface of the exterior lighting.
Only use windscreen washer fluids that are also suitable for use on plastic surfaces, e.g. MB SummerFit or MB WinterFit.
Topping up the washer fluid
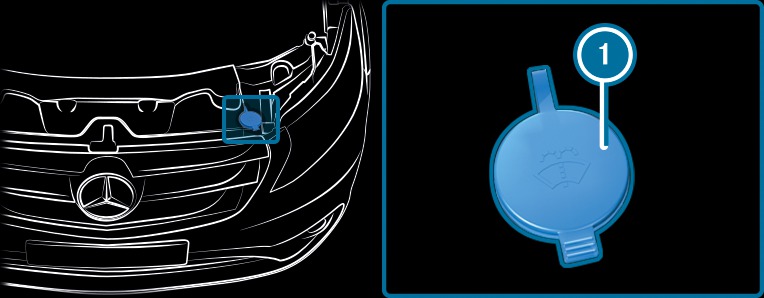
Washer fluid reservoir (example)
Observe the notes on windscreen washer fluid More.
Pull cap  upwards by the tab.
upwards by the tab. Top up the washer fluid.
Push cap onto the filler opening until it audibly engages.
onto the filler opening until it audibly engages. Replacing the windscreen wiper blades
WARNING Risk of becoming trapped if the windscreen wipers are switched on while wiper blades are being replaced
If the windscreen wipers begin to move while you are changing the wiper blades, you can be trapped by the wiper arm.
Always switch off the windscreen wipers and ignition before changing the wiper blades.
NOTE Damage to the windscreen or rear window during wiper blade replacement
If the wiper arm on the windscreen or rear window is folded back before a wiper blade has been fitted, the window may be damaged by the force of the impact.
Never fold the wiper arm on the windscreen or rear window back until a wiper blade has been fitted. Keep hold of the wiper arm when replacing a wiper blade.
NOTE Damage to bonnet or windscreen wipers when opening the bonnet
If the windscreen wipers have been folded back from the windscreen when the bonnet is opened, the windscreen wipers or the bonnet may be damaged.
Ensure that the windscreen wipers have not been folded back from the windscreen.
Removing the wiper blades
Fold the wiper arms away from the windscreen.
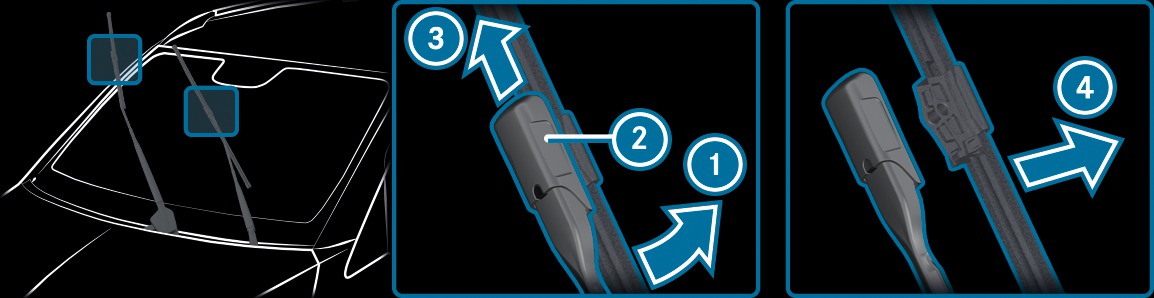
Hold the wiper arm with one hand. With the other hand, turn the wiper blade in the direction of arrow away from the wiper arm as far as it will go.
away from the wiper arm as far as it will go. Slide catch  in the direction of arrow
  until it engages in the removal position.
in the direction of arrow until it engages in the removal position. Remove the wiper blade from the wiper arm in the direction of arrow  .
.
. Fitting the wiper blades
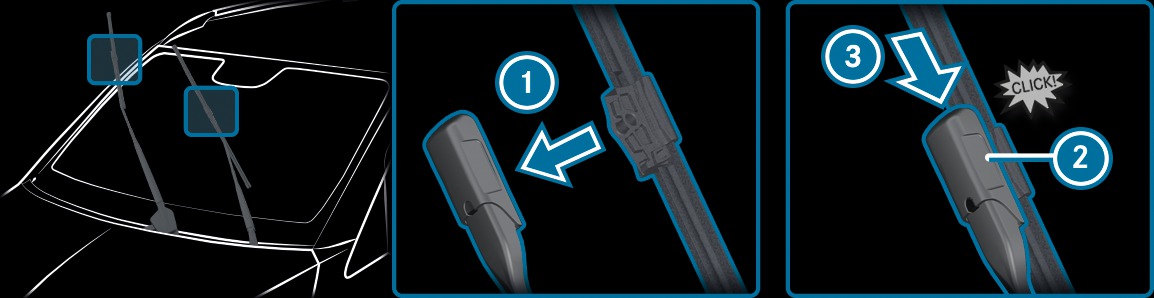
Insert the new wiper blade into the wiper arm in the direction of arrow .
. Slide catch in the direction of arrow until it engages in the locking position.
in the direction of arrow until it engages in the locking position. Make sure that the wiper blade is seated correctly.
Fold the wiper arms back onto the windscreen.
Maintenance display
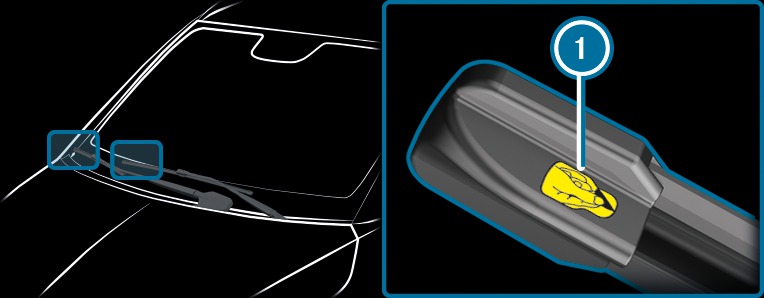
Remove protective film from the maintenance displays on the tips of the newly fitted wiper blades.
from the maintenance displays on the tips of the newly fitted wiper blades. If the colour of the maintenance display changes from black to yellow, the wiper blades should be replaced.
The time until the colour changes varies depending on the usage conditions.