The automatic filling station search is activated More .
The fuel level in the fuel tank reaches the reserve fuel level.
The following notification is shown in the media display Reserve fuel Tap here to search for filling stations.
The automatic filling station search begins. The available filling stations along the route or in the vicinity of the vehicle's current position are displayed.
The address of the filling station is displayed.
The filling station is set as the destination or the next intermediate destination.
The filling station is entered in the route overview. Intermediate destination 4 is deleted. Route guidance begins.
Fuels are highly flammable.
Fuels are poisonous and hazardous to your health.
If you or other people come into contact with fuel, observe the following:
Electrostatic charge can ignite fuel vapour.
Vehicles with a diesel engine:
If you mix diesel fuel with petrol, the flash point of the fuel mixture is lower than that of pure diesel fuel.
While the vehicle is running, component parts in the exhaust system may overheat without warning.
Do not switch on the vehicle. Otherwise, fuel can enter the fuel system.
Even small amounts of the wrong fuel could result in damage to the fuel system and the engine. The repair costs are high.
If fuels are handled improperly, they pose a danger to persons and the environment.
The vehicle is unlocked.
The auxiliary heating is switched off.
The vehicle is switched off.
The front left-hand door is open.
Do not get back into the vehicle during the refuelling process. Otherwise, electrostatic charge could build up again.
Observe the notes on operating fluids More.
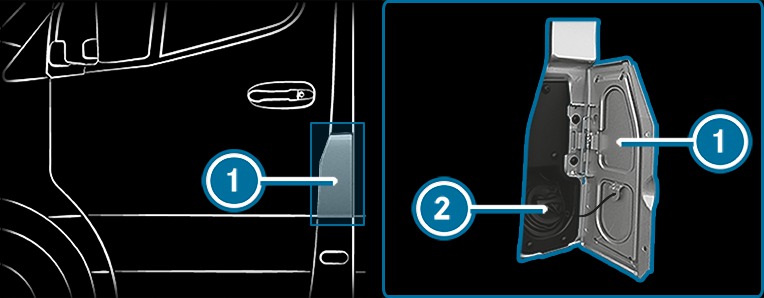


The fuel filler flap is beside the front left-hand door when viewed in the direction of travel. The position of the fuel filler cap is also shown on the instrument cluster  . The arrow on the filling pump specifies the side of the vehicle.
 .
.  anti-clockwise and remove it.
  and turn it clockwise.
 You will hear a click when the fuel filler cap is closed fully.
 .
. Vehicles with a diesel engine and incorrect fuelling protector against refuelling with petrol: the filler neck is designed for refuelling at diesel filling pumps for passenger vehicles.
Vehicles with a diesel engine without an incorrect fuelling protector: refuelling preferred at diesel filling pumps for passenger vehicles. However, you can also refuel at a diesel filling pump for lorries.
If the fuel tank has been run completely dry, top up with at least 5 l of fuel.
Vehicles that can use a mixture of fuels can be recognised by the sticker "Ethanol up to E85!" on the fuel filler flap.
The spelling of the displayed main menu may differ. Therefore, pay attention to the menu overview for the instrument cluster More.
Trip distance:
Reset trip meter?
Trip computer:
From start
From reset
ECO display
The vehicle is switched on.
The current tyre pressure and tyre temperature of the individual wheels.
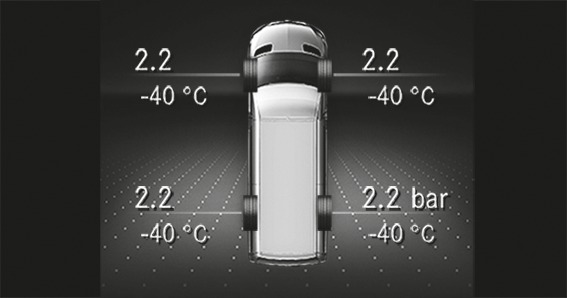
The current tyre pressure for each wheel.
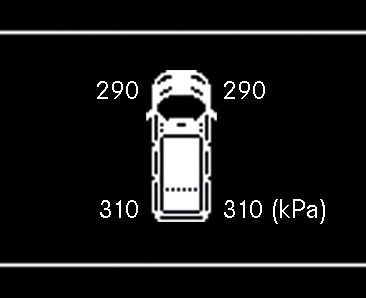
Tyre pressures will be displayed after a few minutes of driving: the teach-in process of the system is not yet complete. The tyre pressures are already being monitored.
The values displayed in the instrument cluster display may deviate from those of the tyre pressure gauge, as they refer to sea level. At high elevations, the tyre pressure values indicated by a pressure gauge are higher than those shown by the on-board computer. In this case, do not reduce the tyre pressures.
Notes on tyre pressure More
The vehicle is switched off.
Top up AdBlue See Owner's Manual
The AdBlue® tank has dropped to the reserve level.
Top up AdBlue Emergency operation in XXX km
You will only be able to drive the vehicle the distance shown. Top up AdBlue® as quickly as possible.
Top up AdBlue Emergency oper.: 12 mph No start in XXX miles
The vehicle speed is limited to approximately 20 km/h. You will only be able to drive the vehicle the distance shown. Subsequently, it will no longer be possible to start the vehicle.
Refill AdBlue Engine start not possible
The vehicle can no longer be started.
Top up AdBlue See Owner's Manual
The AdBlue® tank has dropped to the reserve level.
Top up AdBlue Perf. reduced
Top up AdBlue Emergency operation after engine restart: max. 12 mph
The vehicle cannot be driven at a speed exceeding 20 km/h after the vehicle has been restarted.
Top up AdBlue Emergency operation: max. 12 mph
The vehicle cannot be driven at a speed exceeding 20 km/h.
With a prompt in the display | at least 8 l |
Without a prompt in the display | at least 2 l |
You can also have the AdBlue® level displayed More.
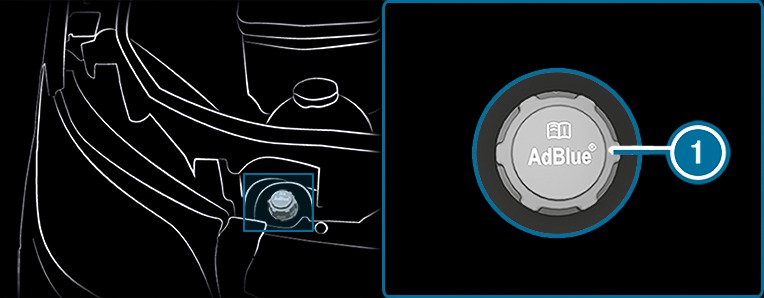
 anti-clockwise and remove it.
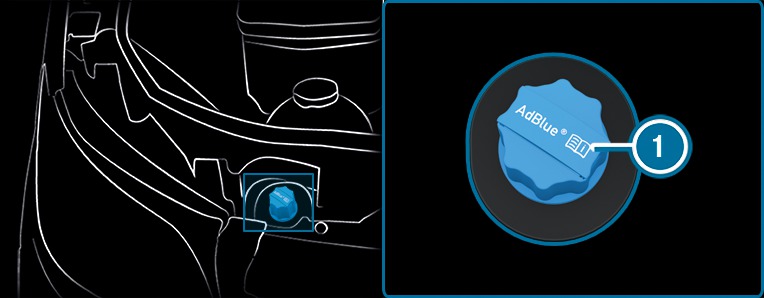
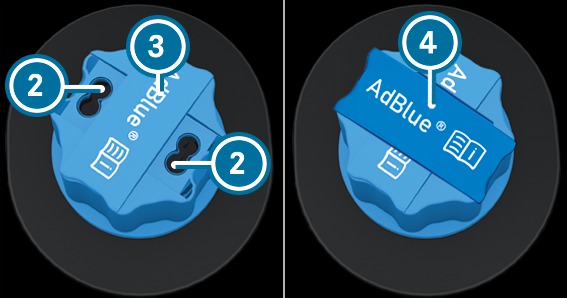
 for unlocking AdBlue® filler cap
  from the vehicle tool kit.
  on AdBlue® filler cap
  up, turn 90° and release it.
  in holes
  of AdBlue® filler cap
  .
.  anti-clockwise and remove it.
 .
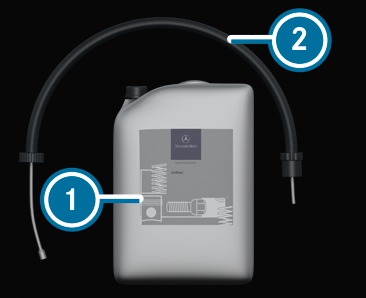
.  onto the opening of AdBlue® refill canister
  until hand-tight.
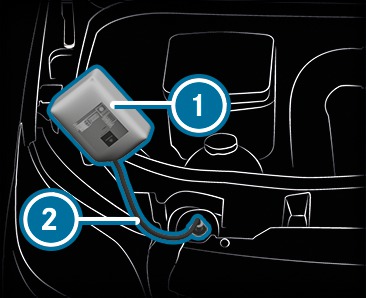
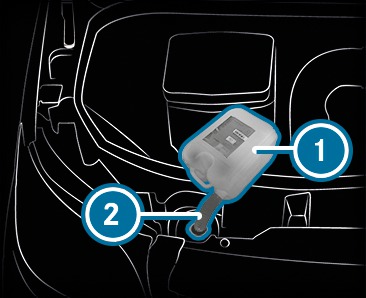
 into the filler neck of the vehicle.
  .
. The filling process stops when the AdBlue® tank is completely full.
AdBlue® refill canister  can be removed when it has been only partially emptied.
 and close AdBlue® and refill canister
  in reverse order.
 Avoid storing AdBlue® containers permanently in the vehicle.
Only screw the AdBlue® refill bottle hand-tight onto the filler opening in the engine compartment. It may otherwise be damaged.
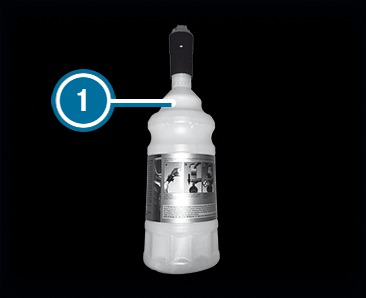
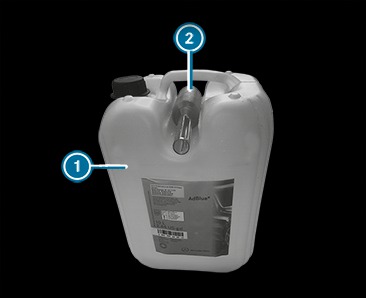
AdBlue® refill bottles  can be obtained at many filling stations or at a qualified specialist workshop. Refill bottles without a threaded cap offer no overfill protection. AdBlue® may leak out as a result of overfilling. Mercedes-Benz offers special refill bottles with a threaded cap. You can obtain this from a Mercedes-Benz Service Centre.
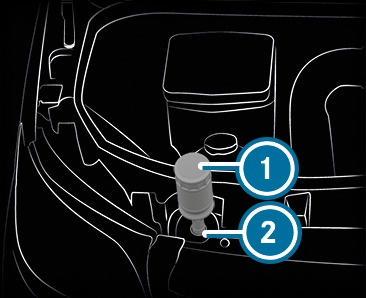
 .
.  as shown on filler opening
  and screw it on clockwise until hand-tight.
  towards filler opening
  .
. The AdBlue® tank is filled. This could take up to one minute.
When the AdBlue® refill bottle is no longer pressed down, filling stops. The bottle can be removed when it has been only partially emptied.
 .
.  anti-clockwise and remove it.
  again.
 on the filler neck and tighten it clockwise.
 The filler neck is only locked correctly when this is the case.


 on the filler neck and tighten it clockwise.
  from AdBlue® filler cap
  and store it in the vehicle tool kit.
  on AdBlue® filler cap
  up over holes
  of AdBlue® filler cap
  , turn and release.
  .
. If AdBlue® filler cap  turns freely, the AdBlue® tank is closed.
Certain components in the engine compartment can be very hot, e.g. the engine, the radiator and parts of the exhaust system.
bonnet
engine oil filler opening cap
washer fluid reservoir cap
coolant expansion reservoir cap
If you open the engine bonnet when the engine has overheated or during a fire in the engine compartment, you could come into contact with hot gases or other escaping operating fluids.
Windscreen washer concentrate is highly flammable. It could ignite if it comes into contact with hot engine component parts or the exhaust system.
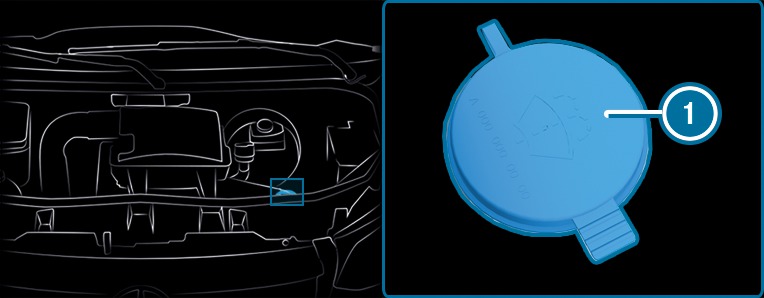
 upwards by the tab.
  onto the filler opening until it audibly engages.
 If the windscreen wipers begin to move while you are changing the wiper blades, you can be trapped by the wiper arm.
If the windscreen wipers start moving when the bonnet is open, you could be trapped by the wiper linkage.
If the wiper blades are worn out, they will no longer wipe the windscreen properly. Replace the wiper blades twice a year, preferably in spring and autumn.

 away from the windscreen.
  and turn the wiper blade away from wiper arm
  in the direction of the arrow as far as it will go.
  upwards in the direction of the arrow until it engages.
  from the wiper arm.
  in the holder on wiper arm
  .
. Driver's side: long wiper blade
Front passenger side: short wiper blade
 downwards until it engages.
  back onto the windscreen.
 If the windscreen wipers begin to move while you are changing the wiper blades, you can be trapped by the wiper arm.
If the windscreen wipers start moving when the bonnet is open, you could be trapped by the wiper linkage.
If the wiper blades are worn out, they will no longer wipe the windscreen properly. Replace the wiper blades twice a year, preferably in spring and autumn.

 away from the windscreen.
  and turn the wiper blade away from wiper arm
  in the direction of the arrow as far as it will go.
  upwards in the direction of the arrow until it engages.
  from the wiper arm in the direction of arrow
  .
.  from the wiper blade.
  to the new wiper blade.
  in the holder on wiper arm
  .
. Driver's side: long wiper blade
Front passenger side: short wiper blade
 downwards until it engages.
  back onto the windscreen.
 The vehicle is level during the measuring process.
The bonnet is closed.
Depending on the driving profile, the oil level can be displayed only after a driving time of up to 30 minutes and only when the vehicle is switched on.
Consult a qualified specialist workshop.
Vehicles with cold oil level displays: the oil level is automatically displayed on the instrument cluster after the vehicle has been non-operational for an extended period. If it is not possible to measure the engine oil level, a message to that effect will appear.
The result of the electronic measurement always takes precedence over other measurements.
Braking efficiency is reduced after washing the vehicle.
Make sure that the automatic car wash is suitable for the size of the vehicle.
Before washing the vehicle in an automatic car wash, fold in the outside mirrors and remove any additional aerials. Otherwise, the outside mirrors, aerial or the vehicle itself could be damaged.
Make sure any additional aerials are refitted and that the outside mirrors are fully folded out again when you leave the automatic car wash.
the side windows and the sliding window are completely closed.
the blower for ventilation and heating is switched off.
the windscreen wiper switch is in position
 .
.
If the vehicle is very dirty, wash off excess dirt before cleaning the vehicle in an automatic car wash.
Removing the wax from the windscreen and the wiper rubbers after washing the vehicle, will help avoid smearing and reduce wiper noise.

