Switching the hazard warning light system on/off
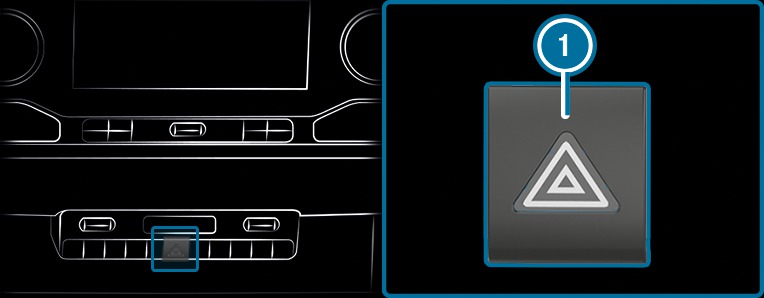
Press button  .
.
. If you operate a turn signal indicator while the hazard warning light system is switched on, only the turn signal lamps on the relevant side of the vehicle will light up.
The hazard warning light system will switch on automatically in the following situations:
The airbag is deployed
The vehicle is heavily braked from a speed of more than 70 km/h to a standstill.
If the hazard warning light system has automatically switched on, press hazard warning lamp switch to switch it off.
The hazard warning light system will automatically switch off when the vehicle regains a speed of more than 10 km/h after maximum full-stop braking.
The hazard warning light system will work even when the vehicle has been switched off.
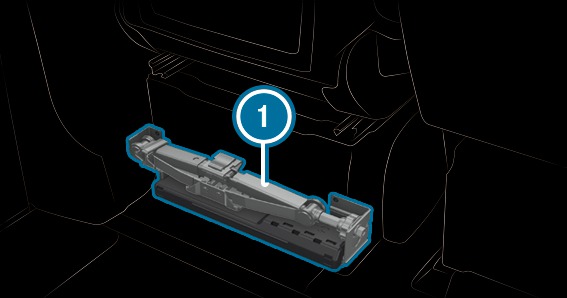
Removing and stowing the fire extinguisher
WARNING Risk of accident due to an incorrectly secured fire extinguisher in the driver's footwell
A fire extinguisher may impede pedal travel or block a depressed pedal.
This jeopardises the operating and road safety of the vehicle.
The fire extinguisher can be flung around and injure the driver or other vehicle occupants.
Always store and secure the fire extinguisher in the bracket.
Do not remove the fire extinguisher while driving.
Removing and stowing
Open the front passenger door.
To remove:
pull the tabs on the bracket of fire extinguisher upwards. Remove the fire extinguisher.
To stow:
stow the fire extinguisher. Push the tabs on the bracket of fire extinguisher downwards.
downwards. In a right-hand-drive vehicle, the fire extinguisher is located on the co-driver's seat on the left when viewed in the direction of travel.
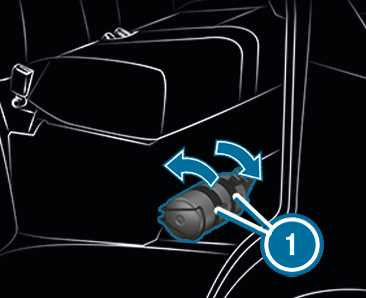
Removing the warning triangle
The warning triangle is located in the stowage compartment in the front passenger door.
Take warning triangle out of the stowage compartment.
Removing the first-aid kit (soft sided)
The first-aid kit (soft sided) is located in the stowage compartment in the front passenger door.
Remove first-aid (soft sided) kit from the stowage compartment.
QR codes for rescue card
The QR code stickers are affixed to the B-pillar on the driver's and co-driver's side. In the event of an accident, emergency services can use the QR code to quickly determine the corresponding rescue card for your vehicle. The current rescue card contains, in compact form, the most important information about your vehicle e.g. the routing of electric cables.
Further information can be obtained at Mercedes-Benz homepage - rescue card.
Starting assistance and charging the starter battery
Always use the jump-start connection in the engine compartment for starting assistance and when charging the battery.
NOTE Damage to the battery from overvoltage
When charging using a battery charger without a restriction of the maximum charging voltage, the battery or the on-board electronics can be damaged.
Only use battery chargers with a maximum charging voltage of 14.8 V.
WARNING Risk of explosion from hydrogen gas igniting
There is a danger of hydrogen gas igniting when charging the battery if there is a short circuit or sparks start to form.
Make sure that the positive terminal of the connected battery does not come into contact with vehicle parts.
Never place metal objects or tools on a battery.
The described order of the battery clamps must be observed when connecting and disconnecting the battery.
When giving starting assistance, always make sure that you only connect battery terminals with identical polarity.
During starting assistance, you must observe the described order for connecting and disconnecting the jump lead.
Do not connect or disconnect the battery clamps while the engine is running.
WARNING Risk of explosion during charging process and starting assistance
During the charging process and starting assistance, the battery may release an explosive gas mixture.
Avoid fire, naked flames, creating sparks and smoking.
Make sure there is sufficient ventilation.
Do not lean over a battery.
WARNING Risk of explosion from a frozen battery
A discharged battery may freeze at temperatures slightly above or below freezing point.
During starting assistance or battery charging, battery gas can be released.
Always allow a battery to thaw before charging it or performing starting assistance.
If the warning/indicator lamps do not light up in the instrument display around or below freezing point, it is very likely that the discharged battery has frozen.
In this case, observe the following points:
do not give the vehicle starting assistance or charge the battery
the service life of a battery that has been thawed may be reduced drastically
the starting behaviour may deteriorate, particularly at low temperatures
it is recommended that you have a thawed battery checked at a qualified specialist workshop
NOTEDamage caused by numerous or extended attempts to start the engine
Numerous or extended attempts to start the engine may damage the catalytic converter due to non-combusted fuel.
Avoid numerous and extended attempts to start the engine.
When jump-starting and charging the batteries, observe the following points:
only use undamaged jump leads/charging cables with a sufficient cross-section and insulated terminal clamps
non-insulated parts of the terminal clamps must not come into contact with other metal parts while the jump leads/charging cables are connected to the battery/jump-start connection point
the jump leads/charging cables must not come into contact with any parts which may move when the engine is running
make sure that neither you nor the battery is electrostatically charged
avoid fire and naked flames
do not lean over a battery
when charging: only use a battery charger that has been tested and approved by Mercedes-Benz and read the operating instructions for your charger before charging the batteries
Observe the additional following points during starting assistance:
starting assistance may only be provided using batteries with a nominal voltage of 12 V.
the vehicles must not touch each other
vehicles with a petrol engine: only perform starting assistance when the engine and exhaust system are cold
Vehicles with a battery main switch:
check whether the battery main switch is inserted More. Secure the vehicle using the parking brake.
Vehicles with automatic transmission:
shift the transmission to position  .
. Vehicles with manual transmission:
shift to neutral. Switch off the ignition and all electrical consumers.
Open the bonnet More.
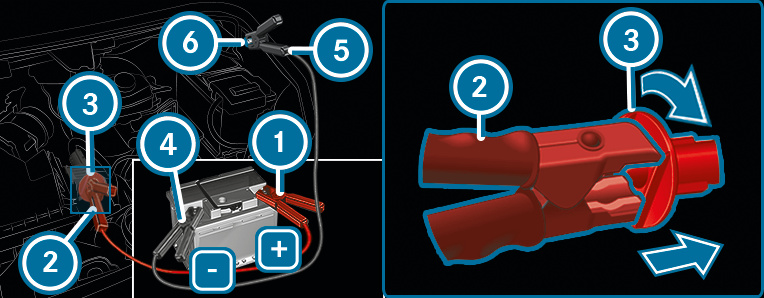
Right-hand drive vehicle: the jump-start connection may be on the opposite side.
Remove the cover from the POSITIVE terminal of the donor battery.
First connect a red POSITIVE terminal clamp of the starting assistance/charging cable to the POSITIVE terminal of the donor battery.
of the starting assistance/charging cable to the POSITIVE terminal of the donor battery. With second red POSITIVE terminal clamp  of the starting assistance/charging cable, slide the red protective cap on jump-start connection
  back with a clockwise turn.
of the starting assistance/charging cable, slide the red protective cap on jump-start connection back with a clockwise turn. Attach second red POSITIVE terminal clamp to the POSITIVE terminal of jump-start connection .
to the POSITIVE terminal of jump-start connection . During starting assistance:
start the engine of the donor vehicle and let it run at idle speed. First, connect a black NEGATIVE terminal clamp  of the starting assistance/charging cable to the NEGATIVE terminal of the donor battery.
of the starting assistance/charging cable to the NEGATIVE terminal of the donor battery. Connect the second black NEGATIVE terminal clamp  of the starting assistance/charging cable to earth point
  on your own vehicle (bare metal part in the engine compartment).
of the starting assistance/charging cable to earth point on your own vehicle (bare metal part in the engine compartment). During starting assistance:
start the engine on your own vehicle. When charging:
start the charging process. During starting assistance:
let the engine run for a few minutes. During starting assistance:
before disconnecting the jumper cable, switch on an electrical consumer on your own vehicle, e.g. the rear window heater or lighting. When the starting assistance/charging process is complete:
To remove the clamps of the starting assistance/charging cable in reverse order: first remove second black NEGATIVE terminal clamp from earth point in the engine compartment, then black NEGATIVE terminal clamp from the donor battery. Then remove second red POSITIVE terminal clamp from the POSITIVE terminal of jump-start connection , followed by red POSITIVE terminal clamp on the donor battery.
from earth point in the engine compartment, then black NEGATIVE terminal clamp from the donor battery. Then remove second red POSITIVE terminal clamp from the POSITIVE terminal of jump-start connection , followed by red POSITIVE terminal clamp on the donor battery. The red protective cap springs back to its initial position when second red POSITIVE terminal clamp is disconnected from jump-start connection .
You can obtain further information at a qualified specialist workshop.
Notes on electrical fuses
WARNING Risk of accident and injury due to overloaded lines
If you manipulate or bridge a faulty fuse or if you replace it with a fuse with a higher amperage, the electric line could be overloaded.
This could result in a fire.
Always replace faulty fuses with specified new fuses containing the correct amperage.
NOTE Damage due to incorrect fuses
Electrical components or systems could be damaged by incorrect fuses.
Only use fuses which have been approved by Mercedes-Benz and which have the correct fuse rating.
The electrical fuses in your vehicle switch off defective circuits. If a fuse blows, all the components on the circuit and their functions will cease to operate.
Blown fuses must be replaced with fuses of an equivalent specification, which you can determine by the colour and fuse rating. The fuse allocation chart and further information on the electric fuses and relays can be found in the "Fuse allocation chart" supplement.
NOTE Damage or malfunctions caused by moisture
Moisture may cause damage to the electrical system or cause it to malfunction.
When the fuse box is open, make sure that no moisture can enter the fuse box.
When closing the fuse box, make sure that the seal of the lid is positioned correctly on the fuse box.
If the new fuse which has been inserted also blows, have the cause traced and rectified at a qualified specialist workshop.
Make sure of the following before replacing a fuse:
the vehicle is secured such that it does not roll away
all electrical consumers are switched off
the ignition is switched off
Notes on flat tyres
WARNING Risk of accident due to a flat tyre
A flat tyre strongly impairs the vehicle's driving characteristics, as well as its steering and braking characteristics.
Do not drive with a flat tyre.
Replace the flat tyre with the spare wheel. Alternatively, consult a qualified specialist workshop.
In the event of a flat tyre, the following options are available depending on your vehicle's equipment:
You can make a breakdown assistance call using the breakdown assistance call button in the overhead control panel .
Change the wheel More.
Overview of the tyre-change tool kit
Necessary tyre-change tool kit may include, for example:
Jack
Wheel wrench
You will find the maximum load capacity of the jack stated on the adhesive label attached to the jack.
The jack is maintenance-free. If there is a malfunction, please contact a qualified specialist workshop.
Vehicles with rear wheel drive
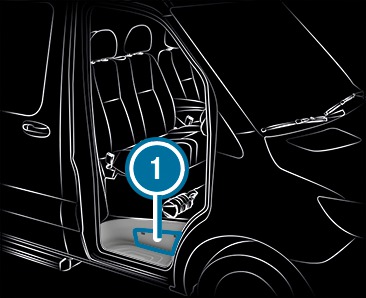
The tyre-change tool kit is located in the stowage compartment above the step of the co-driver's door and in the stowage compartment in the footwell on the co-driver side.
Vehicles with front wheel drive
The tyre-change tool kit is located behind the driver's seat.
Overview of permissible towing methods
In the event of a breakdown, Mercedes-Benz recommends that you have the vehicle transported instead of towed.
NOTE Damage to the vehicle due to towing away incorrectly
Observe the instructions and notes on towing away.
NOTE Damage due to pushing the vehicle
A vehicle with a front wheel drive and automatic transmission may be damaged if it is pushed or towed too far and too fast when the engine is switched off.
Do not push the vehicle more than 15 m faster than at walking pace.
Vehicles with automatic transmission and rear wheel drive: if there is a malfunction, the automatic transmission may be locked in position .
If the automatic transmission cannot be shifted to position  , transport the vehicle More. A towing vehicle with lifting equipment is required for vehicle transport.
Vehicles with automatic transmission and front wheel drive: if there is a malfunction, the automatic transmission may be locked in position . You can release the parking lock manually More.
If the automatic transmission cannot be shifted to position , transport the vehicle More. A towing vehicle with lifting equipment is required for vehicle transport.
 Both axles on the ground |  Front axle raised |  Rear axle raised |
|---|---|---|
Yes, no further than 100 km at 50 km/h | Yes, no further than 100 km at 50 km/h | Yes, no further than 50 km at 50 km/h |
Both axles on the ground | Front axle raised | Rear axle raised |
|---|---|---|
Yes, no further than 50 km at 50 km/h | Yes, no further than 50 km at 50 km/h | Yes, if the steering wheel is fixed in the centre position with a steering wheel lock |
Both axles on the ground | Front axle raised | Rear axle raised |
|---|---|---|
No (when the engine is switched off) Yes (when the engine is running), maximum 5 km at 20 km/h | Yes | No (when the engine is switched off) Yes (when the engine is running), maximum 5 km at 20 km/h |
Both axles on the ground | Front axle raised | Rear axle raised |
|---|---|---|
Yes, no further than 50 km at 50 km/h | No | No |
Towing with a raised axle: towing should be performed by a towing company.