Notes on regularly inspecting wheels and tyres
WARNING Risk of injury due to damaged tyres
Damaged tyres can cause tyre pressure loss.
Check the tyres regularly for signs of damage and replace any damaged tyres immediately.
Check the wheels and tyres of your vehicle for damage regularly, i.e. at least every two weeks, as well as after driving off-road or on rough roads. Damaged wheels can lead to a loss of tyre pressure.
Look out for the following types of damage, for example:
cuts in the tyres
punctures in the tyres
tears in the tyres
bulges on tyres
deformation or severe corrosion on wheels
WARNING Risk of aquaplaning due to insufficient tyre tread
Insufficient tyre tread will result in reduced tyre grip.
The risk of aquaplaning is increased on wet roads, especially when the speed of the vehicle is not adapted to suit the conditions.
Thus, you should regularly check the tread depth and the condition of the tread across the entire width of all tyres.
Minimum tread depth for:
Summer tyres: 3 mm
M+S tyres: 4 mm
For safety reasons, replace the tyres before the legally-prescribed limit for the minimum tread depth is reached.
Conduct the following checks regularly on all wheels, at least once a month or as required, e.g. before a long journey or when driving off-road:
check the tyre pressure More
check the valve caps
Valves must be protected from moisture and dirt with valve caps specifically approved by Mercedes-Benz for your vehicle.
visually inspect the tread depth and the tyre tread across the whole tyre width
The minimum tread depth for summer tyres is 3 mm and for winter tyres 4 mm.
Setting the limit speed for winter tyres
Multimedia system:

Select a speed or deactivate the function.
Notes on snow chains
WARNING Risk of accident due to incorrectly fitted snow chains
Vehicles with rear-wheel drive: if you have fitted snow chains to the front wheels, they may drag against the vehicle body or chassis components.
Never fit snow chains to the front wheels.
Only fit snow chains on the rear wheels in pairs.
Vehicles with twin tyres:
fit the snow chains to the outer wheels. WARNING Risk of accident due to incorrectly fitted snow chains
Vehicles with front-wheel drive: if you have fitted snow chains to the rear wheels, they may drag against the vehicle body or chassis components.
Never fit snow chains on the rear wheels.
Only fit snow chains on the front wheels in pairs.
WARNING Risk of accident due to unsuitable snow chains
Commercially available snow chains can come loose and damage chassis components or brake hoses.
On vehicles with all-wheel or front-wheel drive and single tyres, only fit snow chains approved by Mercedes-Benz for these tyres.
For safety reasons, Mercedes-Benz recommends that you only use snow chains that have been checked and approved. You can find further information on snow chains recommended for Mercedes-Benz in the wheel and tyre overview at Homepage Mercedes-Benz.
WARNING Risk of accident due to snow chains breaking
If you drive too fast with snow chains, they can break, injure other persons, and damage the vehicle.
Observe the maximum permissible speed for operation with snow chains.
NOTEDamage to the wheel trim from fitted snow chains
If snow chains are fitted to steel wheels, the wheel trims can be damaged.
Remove the wheel trims of steel wheels before fitting snow chains.
Observe the following notes when using snow chains:
Snow chains are only permissible for certain wheel/tyre combinations. You can obtain information on them at a qualified specialist workshop.
For safety reasons, only use snow chains that have been specifically approved for your vehicle by Mercedes-Benz , or snow chains with the same quality standard.
The snow chains must be retightened after driving approximately 1 km. This is the only way to ensure the snow chains are optimally seated with clearance to adjacent components.
Vehicles with all-wheel drive: fit snow chains to all wheels. On vehicles with twin tyres, fit the snow chains to the outer wheels. Observe the manufacturer's installation instructions.
Use snow chains only when the road surface is completely snow-covered. Remove the snow chains as soon as possible when you come to a road that is not snow-covered.
Local regulations may restrict the use of snow chains. Observe the applicable regulations before fitting snow chains.
Activate all-wheel drive before driving off with snow chains MoreMoreMore.
If snow chains are fitted, the maximum permissible speed is 50 km/h.
Vehicles with Parking Assist: do not use Parking Assist PARKTRONIC if snow chains are fitted.
You can permanently limit the maximum design speed for driving with winter tyres More.
You can deactivate ESP® to pull away More. This allows the wheels to spin, achieving an increased driving force.
Notes on windscreen washer fluid
Observe the notes on operating fluids More.
WARNING ‑ Risk of fire and injury due to windscreen washer concentrate
Windscreen washer concentrate is highly flammable. It could ignite if it comes into contact with hot engine component parts or the exhaust system.
Make sure that no windscreen washer concentrate spills out next to the filler opening.
NOTE Damage to the exterior lighting due to unsuitable windscreen washer fluid
Unsuitable windscreen washer fluids may damage the plastic surface of the exterior lighting.
Only use windscreen washer fluids which are also suitable for use on plastic surfaces, e.g. MB SummerFit or MB WinterFit.
NOTEBlocked spray nozzles caused by mixing windscreen washer fluids
Do not mix MB SummerFit and MB WinterFit with other windscreen washer fluids.
Do not use distilled or de-ionised water. Otherwise, the fill level sensor may give a false reading.
Filling up the windscreen washer system
WARNING Risk of burns from hot component parts in the engine compartment
Certain components in the engine compartment can be very hot, e.g. the engine, the radiator and parts of the exhaust system.
Allow the engine to cool down and only touch component parts described in the following.
If you have to carry out any work in the engine compartment, touch only the following components:
bonnet
engine oil filler opening cap
washer fluid reservoir cap
coolant expansion reservoir cap
WARNING Danger of burns when opening the bonnet
If you open the engine bonnet when the engine has overheated or during a fire in the engine compartment, you could come into contact with hot gases or other escaping operating fluids.
Before opening the bonnet, allow the engine to cool down.
In the event of a fire in the engine compartment, keep the engine bonnet closed and call the fire service.
WARNING ‑ Risk of fire and injury due to windscreen washer concentrate
Windscreen washer concentrate is highly flammable. It could ignite if it comes into contact with hot engine component parts or the exhaust system.
Make sure that no windscreen washer concentrate spills out next to the filler opening.
Topping up the washer fluid
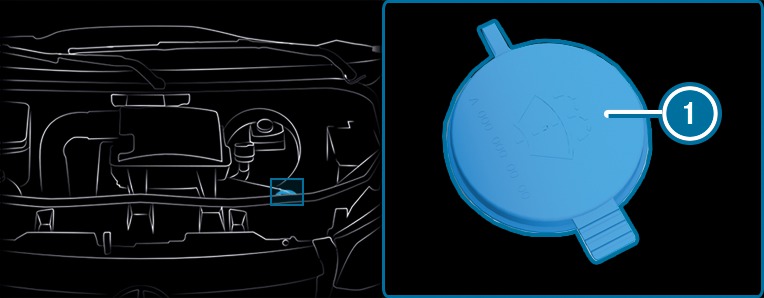
Washer fluid reservoir (example)
Pre-mix the washer fluid in the correct mixing ratio in a container.
Park the vehicle on a level surface and secure it against rolling away More.
Open the bonnet More.
Pull the cap of the washer fluid container  upwards by the tab.
upwards by the tab. Pour in the pre-mixed washer fluid.
Press the cap onto the filler opening until it audibly engages.
onto the filler opening until it audibly engages. Close the bonnet More.
Replacing the windscreen wiper blades
WARNING Risk of becoming trapped if the windscreen wipers are switched on while wiper blades are being replaced
If the windscreen wipers begin to move while you are changing the wiper blades, you can be trapped by the wiper arm.
Always switch off the windscreen wipers and ignition before changing the wiper blades.
WARNING Risk of injury from using the windscreen wipers while the engine bonnet is open
When the engine bonnet is open, and the windscreen wipers are set in motion, you can be trapped by the wiper linkage.
Always switch off the windscreen wipers and ignition before opening the engine bonnet.
If the wiper blades are worn out, they will not wipe the windscreen properly. Replace the wiper blades twice a year, preferably in spring and autumn.
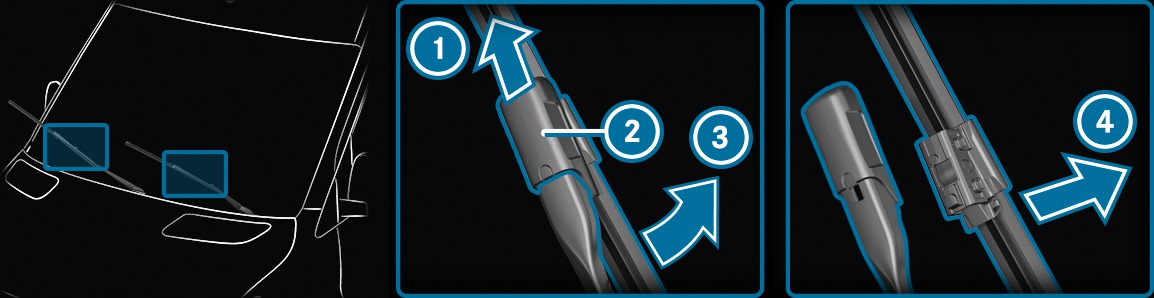
Fold wiper arm  away from the windscreen.
away from the windscreen. Hold wiper arm and turn the wiper blade away from wiper arm in the direction of the arrow as far as it will go.
and turn the wiper blade away from wiper arm in the direction of the arrow as far as it will go. Slide catch  upwards in the direction of the arrow until it engages.
upwards in the direction of the arrow until it engages. Fold back the wiper blade onto the wiper arm.
Remove the wiper blade from wiper arm.
from wiper arm. Insert new washer blade in the holder on wiper arm .
in the holder on wiper arm . When doing so, take into account the different lengths of the wiper blades:
Driver's side: long wiper blade
Front passenger side: short wiper blade
Slide catch downwards until it engages.
downwards until it engages. Fold wiper arm back onto the windscreen.
back onto the windscreen. Setting the hot-water auxiliary heater using the on-board computer
DANGER Risk of fatal injury due to poisonous exhaust gases
If the tailpipe is blocked or sufficient ventilation is not possible, poisonous exhaust gases such as carbon monoxide may enter the vehicle. This is the case in enclosed spaces or if the vehicle gets stuck in snow, for example.
Always switch the stationary heater off in enclosed spaces without an air extraction systems, e.g. in garages.
Keep the tailpipe and the area around the vehicle free from snow when the engine or the stationary heater are running.
Open a window on the windward side of the vehicle to ensure an adequate supply of fresh air.
WARNING Risk of fire due to hot stationary heater components and exhaust gases
Flammable materials such as leaves, grass or twigs may ignite.
When the stationary heater is switched on, make sure that:
hot vehicle parts do not come into contact with flammable materials.
the exhaust gas can flow out of the stationary heater exhaust pipe unhindered.
the exhaust gas does not come into contact with flammable materials.
NOTE Battery discharge caused by stationary heater or stationary ventilation operation
Operating the stationary heater or stationary ventilation drains the battery.
After heating or ventilating the vehicle twice, drive for a longer period of time.
Requirements:
The fuel tank is filled above the reserve level.
The ignition is switched on.
Setting the switch-on time
Select Settings.
Select the desired departure time.
Activating the departure time
Activate the departure time by ticking the box.
Ensure that A, B and C each correspond to a programmed departure time.
The programmed time remains set only until the next time the engine is started.
Selecting a programmed time
Set the required programmed time A, B or C.
The required programmed time A, B or C will appear only if the box to activate the departure time is ticked.
Select the required programmed time by swiping left or right, e.g. A, B or C.